Showing posts with label how to take corners on motorcycles. Show all posts

Monday, October 17, 2016

Basics for Motorcyclists Who Upgrade


This article was initially written in 2014 addressed to a particular group of riders., most of whom were new to the genre of 'Big Bikes' with ample torque and horsepower are their disposal and then with brakes which did nto really suit the habits of the riders or were just not able to compensate for the riders 'newness' - and lastly but not dismissed are the allegations that the brakes were just useless. No matter how that argument proceeds, I felt that the new riders- from Shine to Pulsar, CB100 to KTM390, from RE Bullets to Harleys- I think this article provides some points from my perspective. Please send in your comments- I would love to add them to my article update.

___________________________________________________

Over the past two months, along with Raghav, we have been watching a disproportionate number of incidents involving Street 750s- and in particular their rims.

We have had quite a few bent/broken rims and this post is meant from that perspective for all riders, not just the 750s- as disproportionate the numbers may be, the incidents are not restricted to them alone.

I will list a set of issues first and address the possible corrective measures in a bit

1. A lot of new riders have graduated from smaller bikes, engine capacity as well as performance envelope- wise and the one thing that riders need to keep an absolute control on is the acceleration that their bikes have, as compared to what they were riding earlier. Coming off corners, dropping gears on completing overtaking and turning on the power- etc. This is being coupled with not adjusting your stance and eyesight focus for the new motorcycle is a set up for disasters.

2. Deceleration on seeing an obstacle, be it a goat, truck, pothole, speed breaker- due to the acceleration being of a few degrees higher- more often than not, the riders are 'entering' these conditions faster than they are used to, faster than their bikes can handle and resultant- they either collide with the obstacle, or 'hit' it with force- that it results in deformation of rims and/or other vehicle body parts. Stance and focus again are to be worked on

3. Traditionally tires for Indian motorcycles are of larger profile, due to their experience on Indian roads. As it seems to many, the rubber of the bikes we ride seems to be of softer compound, not to mention of a lower aspect ratio- much needed to ensure safe acceleration and braking, as opposed to having harder compound tires which would result in a disastrous skid in either condition.

Many riders got good exposure with the group rides to Igatpuri just befor the monsoons, and especially on the way down the 8-10Km downhill from Manas to Latifwadi. Gear control, less use of brakes and the proper head position while entering curves, and while riding fast on straights. ( All locations are on the Mumbai-Nashik Highway, providing an elevational increase of about 1000-1200Meters in about 12km of super tarmac)

I will try and elaborate on a few procedures that we feel would make an impact on your quality of riding Let me begin with the smallest but oft ignored technicality first.

1. Check your tire pressure every week or two weeks at the least. This ensures proper aspect ratio of the tire and therefore the best possible protection on impact, optimum tread while riding- meaning safer acceleration and maximum contact while braking.
Most basic air compressors do not remove water vapour and that results in minor heating issues on tires- Nitrogen based air compressors/tanks are usually better maintained, and scrub water vapour better therefore resulting in lesser heating of tires. The difference is marginal and I will be free to argue about this offline. Make sure you have the correct tire pressure saved for your bike on your phone. 

2. While riding- please start making it a habit to use your front brakes more while braking. Most riders we see, use the rear brakes and you simply have to start front-biased braking. Begin to use this at lower speeds, and work your control upwards. For bikes without ABS- learn to pulse the brakes, to prevent seizing the front wheel under heavy braking. Learn to work the front suspension and dramatically lessen your braking distance. While shifting bias forward- ensure that you use the rear to maintain rear wheel directional control and prevent the bike from coming out under your seat.

3. The single biggest issue for new bike riders has been the issue of braking- this being handled in the above point- should be practiced every time you leave your building, and on every ride you do, as only practice will change the way we have been using bikes, with mostly non-existent front brakes till now... 

4. Eyesight- stop looking down in front of your wheel- its too late to do anything about it, except brace for impact if its in front of you. Chin. Chin. Chin.
Its not a song or chant- lift your chin, force yourself to look up- start looking 50-100 meters ahead of you... The faster your go, practice looking at the horizon. further away from the bike. For many that use their bikes in the city, this is a  notoriously difficult exercise- but you have no option, like the front braking issue- similarly this chin-up riding.

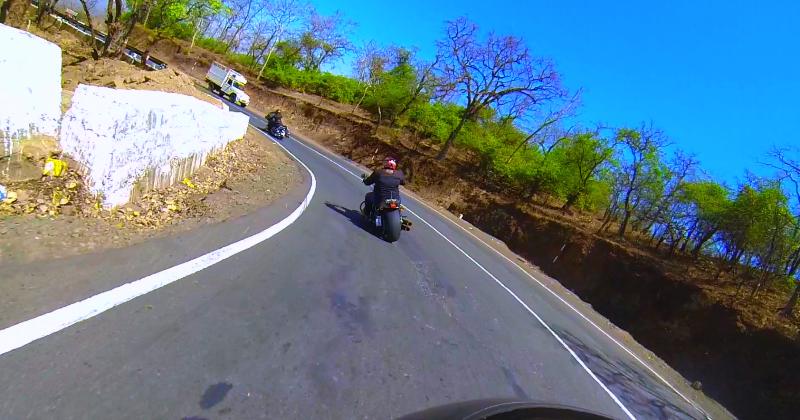
The best road to practice this is that Igatpuri-Latifwadi stretch, where all the time, you will be on the throttle, with the power on the rear wheel all the time, and with your eyes looking as far ahead as possible, into the next turn to check for your line and for any aberrations in the road surface.

This note is by no means comprehensive nor is it a accident-proof-your-bike essay. Practice your new bikes, air pressure, front brakes, chin-up.... make a better rider out of yourself. We are looking at a wonderful riding season from now till April-end atleast.

Help make the group riding experience a better one.

Friday, October 2, 2015

Learn to Lean your motorcycle- Part 2

Contd. from http://beagoodrider.blogspot.in/2015/09/learn-to-lean-your-motorcycle-part-1.html

What did we do?

WARNING: I strongly recommend that you wear proper head gear, elbow padding, chest armour, knee guards, and ankle top boots- always- and even in Exercise 4- you absolutely must. 

Every ride do this

Strap up your safety gear, and every day, every ride follow these exercises. You can never tire of them, and even if you do the same road every weekend, try and better yourself. Be vigilant- be alert.
I meet riders who claim close to a million 'quality miles' which to me are a very good thing- but without the training for the basic evasion and the confidence of banking in first gear, the  reflex and trust you need in your control will gather rust. As with wearing gear- its very strongly recommended that you review exercises 4+5 listed below once a quarter with cones about 12' apart. You will come out a better rider. I know that.

Exercise 1- Chin Up

Pic 5- Chin Up
From the unending bends in Chorla (Karnataka, India), SD sent this picture- a beautiful illustration to show you to learn to ride with your chin up. Look in front. At speeds of 75-80Kmph (~50mph) nothing down is going to be of use to you if you have not seen it earlier. The arrow in the green is highlighting the place where your vision should be, thats what you should be preparing for. 
As you notice in Pic 5, the rider is already preparing for the lean and the more you study the image, the more you feel connected to the road and the upcoming lean, the bend and the line you need to take to make a safe run at that speed thru the turn. Again- readers in distant lands have to understand India had a plethora of 100-135 cc bikes for about almost 25 years before larger cc bikes entered the market. So we have a good class of riders in the 30-58 age bracket who have not seen potent high speed bikes in operation with their own hands. So everyone rode these 100cc bikes with their relatively sad brakes and hard 'high mileage' tires that lasted forever. And by now, they are just so attuned to staring 20' away due to habit, that the whole lean/bend circus becomes almost impossible to achieve. 

Exercise 2- Check Gear

Pic 6a- Looking down
The visual cues are indicators for your line of sight and NOT the line your bikes are to take.
See the cues in Pic 6a. I have used markers to show how many new riders approach bends, eyes down and not looking up. This will prevent you from adjusting your gear and checking your speed, and then there is this hurried action when almost entering the bend. And that is the most difficult position to be. Unenviable and not only that, your indecision will create unnecessary anxiety in the riders behind you, who will wonder 'What the hell is he doing? Which way is he going to go? Slow or wide?' All it needs is for two incidents like this for your fellow rider to lose his confidence in you, and then on be wary about your capability on every turn. It just eats away his joy of riding. Not a nice way to ride.
Scan the edges of the road- try and visualize yourself 10-12 seconds down the road. At 100kmph- ladies and gentlemen - thats almost 330 meters ahead or at @80 its about 260m.


Pic 6b- Chin up
So where do I want you to look- up into the far corners. Look at the cues in Pic 6b. How do we achieve this? By checking our speed before entering the corners. By following Exercise 1, we look ahead, we drop a gear, we come to 4th from 5th, or in this case, down to 5th from 6. Once in a lower gear you automatically gain traction on the rear wheel. And that allows you to control your bike better. Be wary that you do not drop too many gears at high speed- that you will cause wheel spin and get into more trouble than you imagined.
Being in control allows you to see what the riders would be doing- the lead has his eyes on the far end apex, the second rider- keeping an eye on the shoulder, watching the lead in his front-right while the camera bike has a direct line watching whats way ahead till his eye can see- enabling all three riders a fantastic view of the road at a speed well over the ton mark. If you want to take a bend this is the way- absolute calm. And yet with a lot of leeway to react, change track- if anything untoward were to happen.

Exercise 3 - Steady Throttle

Having looked ahead and gotten your speed under control to enter a bend- the most crucial part of the bend- to hold a very steady throttle and not 
a)let go of it and cut out the accelerator
b) yo-yo the bike with on-off throttle movements or
c) decrease the throttle, unless you want to power out and stop alongside the curve.


Pic 7- Steady Throttle

If you hold the throttle, the power stays on the rear wheel and your center of gravity stays in one place, slightly to the rear of the bike. The minute you let go, what happens is that you shift your load to the front and thereby loading the slimmer front wheel. This is what brought us to the overall exercise in the first place. The front then straightens up and if you do not have enough road to correct yourself, then you will run wide and crash, either off the road or into incoming traffic. 
As seen in Pic 7  the camera bike as held his line and a parallel bend to the leaders and with a clear sight of the apex. like earlier, if you study the picture, you see SR astride the Street Glide in a complete relaxed state of ride and with the bike in full control- 400Kg (about 800lbs) in full tilt- amazing- ready and anticipating any untoward intrusion in his line.

Exercise 4+5

Steering or counter-steering- I thought very hard about this- and I found this impossible to teach this. As it is riders are having trouble leaning are not achieving speeds to take corners properly. Leave alone concentrate on the bends in an enjoyable manner. They have no bandwidth to figure out the meaning of counter-steering and the logic that some riders use to explain/vouch for it. Once you learn to look up and search for your 'exit' and check your gear and get your bike in a steady throttle state- your steering will follow automatically.
Another issue that riders have is not being told/taught to exercise their elbows. Start doing the 'Figure of 8' and start in riding circles. Do three '8's' and three 'Circles' and then take a 100' ride in a straight line. Come back and do the 8 and the Circle in the other direction. Do not over do it to a point of vertigo and crash or fall.
On this 1914 Bailey Bridge outside Mumbai, SN and me managed to get the Fat Boy and the 48 in a ballet of sorts. Fantastic roll-on the road- desolate- no traffic.

Pic 8 Circling on the Old Bailey
The 'graduating test' if I were to design one- 12 cones, of which the first 8 would be the Slalom, ending in the 9th, and the figure of 8 run twice between the cones 9, 10, and 11- but inside 12.

What does your pillion do when you bank?

Often times you get asked this Q. And I say lean with the bike. Then often, you see people try and struggle and sit straight while some tragically funny ones actually try and lean counter to the rider. Here, as seen in Pic 9, Mr & Mrs RKa show the way- with the Mrs doing the perfect job on the rear seat.
Pic 9- Pillion- Lean into the turn
If you struggle against the lean, you will upset the flow of the bike and the vertical plane of the CG will then have an unnatural force acting on it.
The best way is to place your hands on your knees- for the pillion and then stay that way, so that the upper body sways automatically which ever way the bike leans.

Where do we go from here?

The inspiration to lean and bend has to come from somewhere- whether by learning or by riding alongside. I can think of none other than my #BombayHarrier brother SN, seen here in Pic 10, exploiting his 48 on a crowned road. Keeping his otherwise scraped foot peg read for the raised edge coming up. Chin up, throttle on, eyes on the apex.
The more you look at this- the more you want to get up, get off, check your tires and get leaning like him.

Pic 10- Bend it like 'Smokey'
-KD
#BombayHarriers

Articles on 'Managing Diabetes' and 'AIDS' @ http://therealslimkd.blogspot.in/


Wednesday, September 30, 2015

Learn to Lean your motorcycle- Part 1

Are you leaning at all?

There are a few dozen good articles on leaning/banking on Google and a dozen more on talking about steering- counter or otherwise. I thought of a unique approach to helping riders diagnose the fact that they have a problem (strange not many do acknowledge that) and then address it with visual cues.
Pic 1- DM holds the 240mm rear of a Night Rod in a perfect bank downhill
Why is a good lean healthy- for starters? A HD Road King turns when upright in about 24' whereas if you learn to lean you could do it in 20' and if you are really foot board scraping in the first gear- about 18' should be good. We tried this of Palladinos measurements- and a good rider or two can show how to shave of 1/3rd your turning diameter- which one day will get you out of trouble. I got my Fat Boy to turn within 22' and one day when I ride like Jerry, maybe 18' will be possible.
In Pic 1- you will see the reason for controlled banking and what happens if you were to lose your nerve. Physics will take over, you will use the front brake to slow down and that will shift your CG forward, load the front, unstablising the bike and causing it to straighten and run wide. This will take you into the path of the upcoming Jeep with potentially disastrous consequences.
Almost every rider upgrading from what was Indias staple 100cc bouquet of bikes has faces this situation. So what to do about this?

What are the aids available?

Assuming that you have the proper air pressure in your tires- you could then- start off. Visual inspection for banding is the first step and most important. Any sign of banding is bad news for the tire. It means that you will wear out one portion of the tire faster as you are causing all the wear/tear at that area only.
Strange that many would not know, but there are other visual cues available. There are a few kind tire manufacturers that have 'fun markers' on their tires and the KTM rear shown on a 390 is a perfect example. AR got this for me and highlighted in read are the lean markers that show how well you are banking on a tire designed to take banking.
Pic 2- Fun Markers on a KTM
Here in Pic 2 we see that the rider comfortably banks till level 4 (marked with the green,) which considering the predominantly urban use of the bike, is very good. I would dread to be touching 5 in Mumbai roads. Using these numbers as a guide, I feel the rider can tell how he has been running the bike, and if he has been using the gear box to its fullest potential- or if he has been running a gear too high or low- and therefore not maximising his 'control' potential to its fullest.
A regular check also enhances safety as you will notice that these tires are no longer the 25-30,000Km 'hard' MRFs that shod our Bullets and Hero Hondas of yesteryear but are now softer to enable bette cornering, high speed stability by also better braking to stop the bikes.

What do I want you to do?


 When you do to your bike, I want you to clean your tire with a dry cloth and see your rear tire. Closely.
A friend who has worked with me tirelessly on this topic volunteered his bike- more so because the improvement is actually visible :-) later in the article.

Pic 3- Straight up riding caused this banding
So what do we see here- a band of worn tire right down the middle (marked in red,) showing that the rider would be riding upright most of the time, and the shortcoming being the inability to lean- the reasons could be from the fear of falling- brought about by either a return to biking at a late age, inadequate learning, improper education, or in some cases, pure fear of leaning, fear of own capability or that of the bike itself.
Mine is to dwell in correcting this- not finding the cause.
So in highway riding, we see the slightly used areas adjacent to the Red bands in Pic 3. The outer band in green is this picture is a result of banking on highways runs and on easy long corners that are seen so often on the straight highway like NH8 going north  and then NH17 heading south of Mumbai- something like the gentle curves of I-77 South in the Virginias.

So what did we aim for?

Pic 4-  Huge improvement in utilising the width of the tire
We aimed for this- utilising the most of the rubber. as shown now in the green. The intent was not to scrape the knees but to enhance rider safety by encouraging him to
a) utilise the handing of the bike to a better degree,
b) use the gearbox better and
c) just be able to maneuver the bike in a more adroit manner.
d) get better tyre life out of your piece
The benefit for one would be- to be able to swing out of the way of a car that would stop right in front of you for no apparent or explicable reason, where your ability to move around him was the only possibility other than rear-ending him with damage to ones own bike. In but a few weeks of riding, the rider showed tremendous improvement in banking and how did he get there, well thats to be seen first in Pic 4. The central banding will not go away, and possibly a new tire when the tread diminishes would then see more even wear/tear the next time around.So this then becomes the right time to focus on spotting the problem and then working on it.

Once you have diagnosed the problem, then you head to Part 2 - how to go about rectifying it in three steps.
-KD
#BombayHarriers

Contd.
http://beagoodrider.blogspot.in/2015/10/learn-to-lean-your-motorcycle-part-2.html

Do read my articles on 'Managing Diabetes' and 'AIDS' @ http://therealslimkd.blogspot.in/